The future is lagging.
Steady Head
2ND PLACE - SENIOR DESIGN PROJECT
My senior design partner and good friend Nicolas Montoya and I got into golf in 2021. We were going to the driving range and trying to learn the intricacies and mechanics of a golf swing. It was extremely challenging and we recorded ourselves with a camera to see what we were doing, but it wasn't giving us the all the angles. So, we thought it would be useful to have sensors on us to see what our body, and more importantly our head was doing through the swing shown on a model in an app. As some may know, a great golfers head remains in the same position throughout the swing.

GENERAL DESIGN AND PART SELECTION
One of our main goals was to get the movement data from just sensors on our body. We didn't want to setup external sensors to collect the data because that would make the product more cumbersome. The ST microprocessors had a great library for inertia measurement units (IMU) integrated circuits and would output degrees of rotation and accelerated movements. We would use this data and the kinetics of the body to determine where the head or another body part has moved. We choose the STM32F429BIT7 because of its high clock speed and availability which was low given it was in the middle of the silicon chip shortage.
For the IMU we chose the Adafruit LSM6DSOX + LIS3MDL for its compatibility with STM.

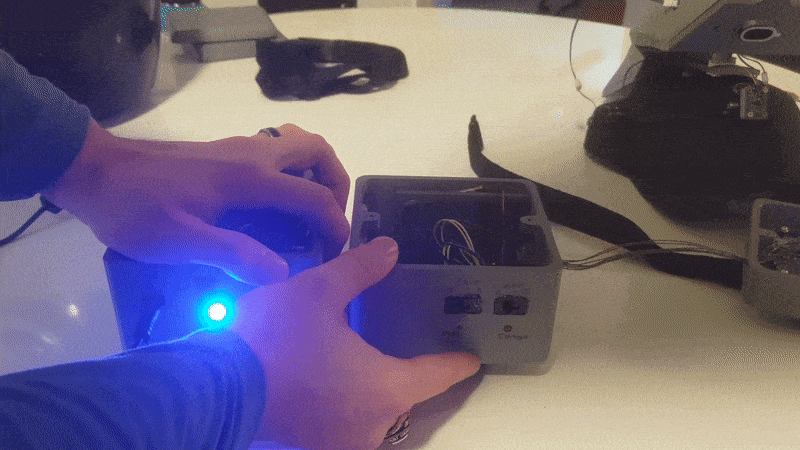
Wireless Charger
The wireless charger was my mountain to climb. I made it as simple as I could by making the design not worry about size constraints. I didn't want to worry about doing a cell phone size charger given the complexity of creating this circuit already. I choose 12 volts DC as an input voltage since that is a fairly common power brick voltage and would transmit enough power after losses. My goal was 1 amp of charge current on the receiving side and was able to produce this.
The transmitter starts off with a modified Royer Oscillator to convert the DC into AC at around 130kHz, a common frequency in the allotted band for wireless charging set by the FCC. A problem with AC especially at resonance is transient voltages or voltage spikes. In the power grid, there is no way to stop it and they just build the grid to withstand these transients. In simulation in LTSpice, the voltage I was producing at the transmitter coil was already at 50V, but would spike up to 150V! This is similar to water pipes when they open a valve the slamming pressure from the rushing water will cause a huge spike in pressure. They stop this by slowly opening the valve. I decided to do the same thing using a load switch by slowly letting the power into the resonating circuit. This significantly reduced the transient, but I still had all parts rated for double the voltage just in case the real-world circuit had more of a story to tell. I also put transient voltage suppressor(TVS) diodes in the circuit as well as another safety backup.
The receiver was a simple non-resonating coil going through a full bridge rectifier with some capacitors going to a buck converter.
The transmitter also contained a thermistor to command shut off if some foreign object was getting hot. The device also contained some limit switches to only turn on the transmitter if they were pressed. A signal would be given from the charger to stop the transmitter if the battery was full. All of these features were for safety and show for my senior design assignment. I would use a standard like Qi if I was to actually implement a wireless charger.
 |  |  |  |  |
|---|
Haptic Feedback
Another feature we thought would be useful is haptic feedback on the sensors. On the head it could tell you if your moving your head to much in a certain direction. On the arms they could tell you if your swing path is too far out or to close. On the hands wrong angles...etc. We implemented this with some simple level shifting circuits activating small vibrator discs, and some modifications to the sensor fusion library that outputs the degrees of rotation. By setting some limits we could get feedback on various discs around the head and back.


Reflow Oven
We wanted to use the STM processors and small surface mount parts, but felt that soldering by hand would be high risk and time consuming. We were afraid of overheating parts especially the processor and not getting good connections. So, using a toaster oven, relay, and thermocouple, we made a nice reflow temperature curve for our oven and had nearly perfect results.
Final Product
I bought a 3D printer for us to put together and use to reduce trips to the school and not have to wait in a que for printing parts. We each designed our own enclosures with regards to mounting, user interface, and accessing internals for debugging.
My partner had become familiar with Unity and created a beautiful interface and model for our data to be displayed on through unity. The data went through a Bluetooth low energy breakout we used straight to the phone and could send and receive commands. He posted a demo of the model working here.
The wireless charger took up a lot of time and I handled timing and assignment deadlines and documents for the two of us to balance the workload.
 |  |  |  |  |  |  |
|---|